The first step in putting together a metal model is to wash it. Yep, wash it. You know how you spray a muffin pan with PAM before you bake’em so they pop right out of the pan nice and easy? Metal manufacturers do the same thing only unlike the tasty butter flavored spray, you don’t want this spray left on your model because your paint will have a devil of a time sticking to it.
This spray is called a release agent and typically oil based. Like anything oily, things don’t like to stick to it, that’s why we have to wash it off. I use regular dishwashing detergent in warm water. Use something that has detergents in it as this is what helps release the oil from the surface. The water doesn’t need to be too hot as thinner sections of certain models can actually bend or deform under very hot water. I simply soak them for a minute or two, swish’em around a bit, rinse them under warm water and towel dry. That’s it. That’s the first trick to keeping your paint on the model. The second trick is primer, which we’ll cover later.
 START CHOPPIN’
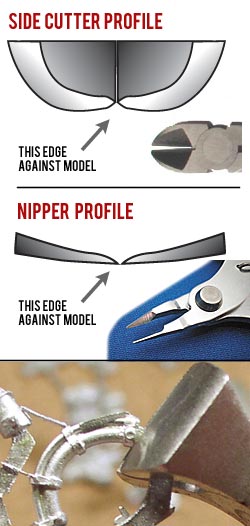
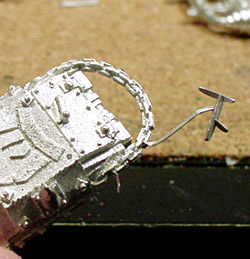
Removing the parts from the sprue, whether metal or plastic, should be the same. You can use an X-Acto or hobby knife but a nipper or side cutter is better for a number of reasons.
Safety First! Some sprues have quite a large area holding the part on. Using an X-Acto to remove these parts is hazardous to the piece at best and hazardous to yourself at worst. Just one slip while you’re putting enough pressure to cut through that much plastic or metal can lead to ruining a part or even getting stitches. It’s happened!
Using a miniature side cutting pliers is good – a nipper, better. A side cutter is typically bigger than a nipper and can possibly move along the seam attaching the part to the sprue and cause deformity in the plastic. Using a nipper nearly eliminates this and leaves a smaller piece of excess plastic which is easier to remove. Always place the flattest side of the cutters against the model. This will give you the closest cut and leave less for you to clean or sand off.
Of course, if your model is a single piece, these last two paragraphs don’t matter.
 CLEANUP
Now that everything is washed, dried and freed from their sprues, it’s time really clean up. This can be the most boring part of modeling (and frustrating if it’s poorly cast) but a little diligence and patience pays off in the end.
The most common corrections you’ll have to make here are for mould lines and flash. Mould lines are typically due to the moulds not lining up perfectly. Mold lines can sometimes be tricky to spot as the reflecting metal can make things a bit hard to see. Sometimes priming a model very lightly will make unseen mold lines pop out. Many of the newer models (at least from Games Workshop’s Citadel line) are sculpted in a way to hide mould line should they appear. An older model that’s used the same mould will tend to pick up these lines as it the mould wears out. Which also causes….
 Flash. This is usually metal sticking out of the model where it shouldn’t be. From thin spires of metal to wide flat spots coming out of mold lines, flash is excess metal the original sculptor didn’t put there. Flash can usually be carved or sanded off of the piece while being careful not to remove areas that shouldn’t. I’ve removed plenty of bolts and wires because of inattentive flash removal.
Removing mold lines is usually a trickier task. This is where the miniature hobby files come in very handy. Use the files to sand down both sides of the mold line until you can no longer see the line. If there’s a risk of ruining another part of the model or losing detail where you don’t want to, make a custom size/shaped file from either a fingernail file or by gluing fine sandpaper to a popsicle stick and trimming it to fit the space.
EXPERIENCE TIP: Removing mould lines is the most tedious part of doing up your model (the right way). It can easily be rushed or even passed by because you don’t want to do it, it’s much more fun to glue and paint. Many mould lines even look like they’ll disappear by using a little more paint. This is true in some cases, but not many. If you use the drybrushing technique (which is very common), mould lines will jump out like a horrible surprise party you didn’t want to attend.
Once you start cleaning up your models correctly you’ll start to notice it on other models. It will be a glaring omission of detail as you progress with your skill. If you plan to enter competitions (especially any with some talent involved), mold lines will almost ALWAYS knock you out of any running. Of course, if you’re OK with it, that’s fine. Just be aware if you plan to be competitive, it’s good to start this habit early.
After you’ve cleaned up all your parts (sounds a little dirty) it’s time to test fit everything. Pretend you’re going to put your model together but without any glue. This should show you were any gaps are or other physical corrections need to be made so the parts fit together correctly.
EXPERIENCE TIP: A good trick is to use something called poster tack or sticky(blue) tack. It’s for hanging posters on the wall without using tape. It comes in a small sheet, about 3” square, and in various colors – blue and yellow being the most common – and can be found in many places including craft stores and supermarket school supplies aisles. Use tiny bits of the sticky tack to temporarily hold the model together to check the pose and positioning of all parts. File to fit anything that doesn’t align properly.
For areas with large gaps, I use a glue galled Zap-A-Gap. It’s a gap filling superglue that’s thicker than regular superglues. I try to use enough to fill any gaps as I assemble the pieces. I also use paint to hide or camouflage gaps that can’t be filled by the Zap-A-Gap. It’s done alright so far.
For those areas where the gap filling glue won’t work – fine detail areas, fur or large smooth areas, we’ll need to use some green stuff. “Green stuff” is a two part epoxy putty produced by Games Workshop. It comes as two strips of putty, one yellow, one blue. You pinch off even amounts of each, mix’em together by kneading it like miniature Play Dough, then using dental sculpting tools you push tiny amounts into the cracks and sculpt the detail that the gaps have lost. Hopefully I’ll have more info on this in the future as I don’t do much of that yet and don’t have the experience to share.