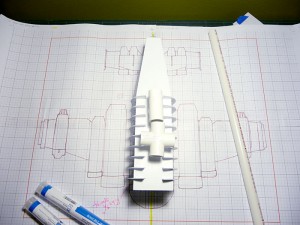
Stopped off at the hardware store at lunch today and picked up some pvc and epoxy putty. I picked up 1×4-way connector, 1xT connector, a male/female threaded connector, a 2′ piece of pvc pipe (all in 1.2″ dia.) and two tubes of plumbers epoxy putty for around $12. Nice and cheap!
I get home and lay the pieces out for test fitting…
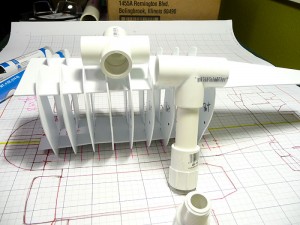
GASP! I had always intended to us 1/2 pvc as my main internal structure so I based my ribbing spacing at 3/4″. Way more than enough room, right? Uhhh… As you can see, the connectors are wider than 3/4″. Me being the non-genius that I am, didn’t take into account that the connectors (which have to fit inside the ribbing too) would be much wider than the 1/2 pipes them selves since they fit OVER/OUTSIDE the actual 1/2′ tubing. If I ever do a second blasta boomer, I know to base my spacers on the dimensions of the CONNECTORS! not the pvc pipe I’m using.
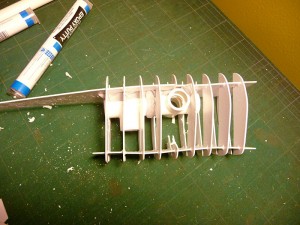
This will mean i have to cut out one spacer to let me get the connectors inside – the angles I cut them at hinders this a swell so the Dremel gets a good workout and cutting away some of the interior ribbing to get everything in there – more of this can be seen in the last photo of the post.
Here’s rough placement (outside the ribbing) to see where I plan on placing the connector points.
Now, the placement of both the 4-way and the T connector are completely guesswork. I have no idea of how heavy this thing will be in the end, where the actual center of balance will be so I I’m doing a “best guess/cross my fingers” placement. I know pox’s build had the center of the wing/fuselage cross point as the center of balance where the tripod connected to the plane. I’ve decided to change that a little – we’ll see if it bites my in the ass later. Because of the estimate weight of the tail I don’t think this would work in my case.
If things turn out to be way off balance I’m assuming it’ll be in favor of the nose. The way I’m building this (nose to tail), I’ll be able to easily hide extra weight in the tail section as I fill it in to counter that. Again, I’m hoping that’s how it’ll work.
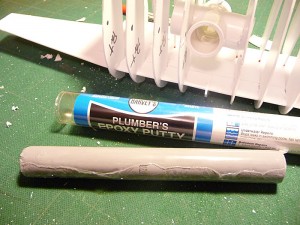
Here’s the putty I purchased. I couldn’t find the brand pox suggested but I’m pretty sure this is reasonably close – and it’s really cheap. It’s around $5-$6 a tube. You can see some of the carnage I had to inflict on the internals to get the connectors in there..
Here’s the “backbone” showing the final placement. There will be a short piece coming out of the front side that will be glued to the nose plate and a longer piece extending through the tail to give maximum support across the entire length of the plane. I’ve decided to leave the side wing connectors open and have a short piece of pvc coming out of the wing to make them removable. PVC fits together pretty snuggly so I’m not to worried about connection strength – the wings won’t be that heavy.
I’m hoping to have the rest of the “backbone” finished and puttied down by the end of tonight and maybe started on the main central structure of the wings sometime this weekend.
A note on the putty… I read the instructions inside the tube and they mentioned something about wearing rubber gloves of some sort. I kinda blew this off as being “over protective in this litigious society”. Nope, for two reasons. One, not only does it get sticky when you’re kneading it, the stuff will get embedded into the pores of your skin and be hell to get off. Remember, this stuff sets up like concrete steel – imagine that in your pores. Second, it gets hot! I was surprised by how much heat is generated by the chemical process while mixing. This does make it a little trick when trying to apply this in tight spaces (as I did) but the latex/rubber gloves were worth it in the long run.
(yes, I spent 15 minutes trying to remove the compound from my skin after the first application).


