
Why Should I Base Metallics? A Tutorial.
Why Base Metallics?
 That’s a good question! Some may not even know the technique exists but it’s a very easy thing to do to make your metallics “pop” better – and it’s based on science!
The stuff in paint that makes the color is called pigment. The pigment is suspended in a variety of suspensions until it gets painted on something and the suspension fluids dry. It’s usually granular, like a powder, which, on a microscopic level, is round-ish.
Metallics on the other hand are tiny, tiny flakes. These flakes are larger than the powder for pigments. If they weren’t, there wouldn’t be enough surface area to reflect off of and be shiny to appear metallic. This is the main reason why metallics don’t cover a surface as well as pigmented paints. Since they are so irregular, they don’t typically lay nice, flat and close together like fine grain powdery pigment does. This causes gaps (although very, very small gaps) to occur between the flakes. This is where basing for metallics comes in.
Let’s look at two surfaces very close up (magnified a billion times or so 😉 ) One is a surface painted with pigments (left) and the other with metallics (right).
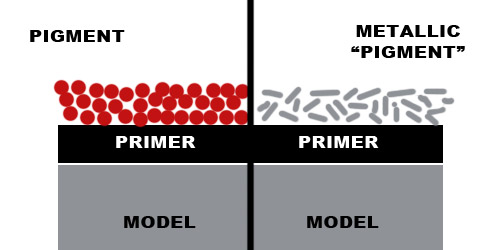
As you can see, pigmented paint tends to settle into a tightly packed state, not a lot of space for light to penetrate to the surface of the model. This illustrates a few things; finer ground pigments cover better, and many smooth coats cover better than one thick coat. The metallics, however, don’t settle in as tight as the powdered pigment due to its shape (or irregularities).
Note: Yes, there is a primer. Yes, it’s a black primer. I almost always prime black and a lot has to do with treating metallics and I prefer a darker tone to my models.
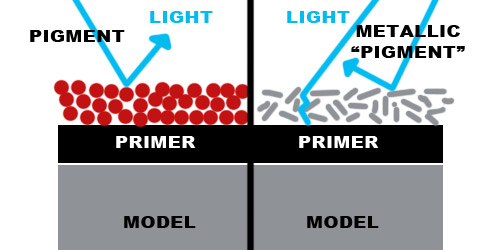
In image number two I’m simulating (on a somewhat abstract scale) the travel of light to the surface of the model. On the left, the tightly packed pigment lets almost no light through to the surface. On the right, the light has enough room to reflect down to lower layers, sometimes even reaching the surface of the model before being bounced back to the surface and scattered to the sky.
Now here’s where the science is – how reflective color works. Light comes to us from the sun composed of many different wavelengths which we perceive as the visible color spectrum. ROY G BIV for all of you mnemonic folks out there. When that beam hits a surface, the surface absorbs some of those wavelengths, bouncing the rest back. The wavelengths that are not absorbed are what we perceive as the color of the object. An example: if I see a blue Frisbee, it’s absorbing ALL of the colors in the spectrum EXCEPT blue, which is reflected and is interpreted by our eyes as blue. Weird, I know. Science class is over, now back to painting.
Looking again at image 2, we see the pigment absorbs all but the red spectrum and bounces red back out to the world. In the metallics side, we see two different things happening. One, the metallic fragments bounce back almost ALL of the color spectrum, not absorbing anything (we’re assuming a silver metallic for this example). Two, not all of the light is reflected, some bounces around inside the metallic maze until it hits the black primer, and stops.
Science, Part II: Black absorbs ALL wavelengths and reflects nothing back.
Now let’s take an even CLOSER look at the metallic painted surface…
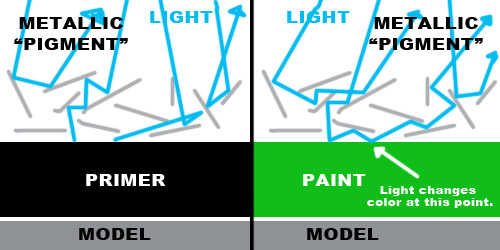
On the left we see the light rays interacting with the metallics, some of it bouncing back out, nothing being absorbed by any metallic surfaces. Some of the rays are absorbed by the black primer underneath. On the right we see light reflecting back out as in the other example but note there’s something else happening. The rays that work their way to the surface aren’t absorbed by the black, they absorb only SOME of the frequencies, changing the color of the beam as it passes through and eventually bounces back out. In this case, it’s green. This green will subtly change the color of the metallics. The effect can be described as a “muddying” of the metallic color.
Well, I can see what you’re thinking already… “Why not just put down another layer of paint?” Well, you could. There’s a few issues with this. Metallic paints are generally thinker to start with. Too many layers will quickly obscure finer details. Also, most likely you’re thinning your paints already to get a smooth, even surface and adding another layer would defeat that purpose. A thin layer of primer or black will keep your surface details crisp, absorb any stray light that reaches the models surface through an already thinned paint layer and the light will not change it’s color on it’s way through the maze of fragmented metal.
Now this isn’t to say that metals can’t have color. Bronze, brass, copper, gold, anything anodized, etc. is a colored metal, but basing in black means you have the effect you want and expect from the pot of paint. Take gold for instance; If I’ve got a nice yellow gold, and my base color is blue, the color reflected back will subtly change towards the green (yellow+blue=green). With a black surface, the nice shiny, bright gold i want will remain just that, shiny bright yellow gold.
A word on priming with white. “Ok”, you say, “If black absorbs all frequencies, white must reflect all frequencies, right? Wouldn’t it be better to have ALL of the light reflected back through the metallic shards? This would make it even shinier, right?”
Well, yes, but the problem there is if everything is lighter, there’s no CONTRAST for the metallic to be compared to. Using a black underneath does absorb the light but it’s that absence of light that increases the contrast in the reflection of a metallic. I know it sounds daffy but take it from a 15+ graphic designer vet, it works.
So there you have it. A long winded, scientifically based exposition on why you should base your models metallic areas in black before painting the metals.
Later!

